14. How to Drill-Through Tile Without Cracking It
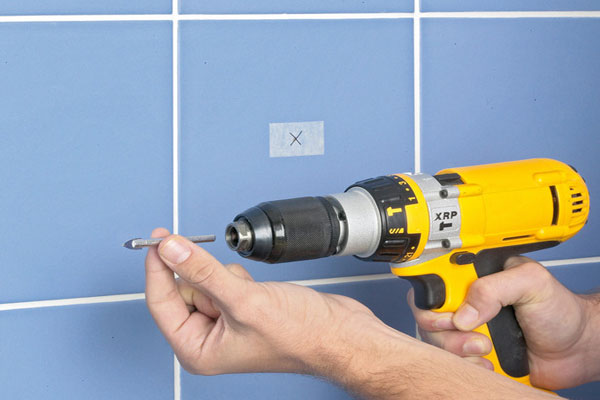
Whether mounting towel bars, tissue roll holders or shower grab bars, there comes a time to drill through ceramic, porcelain or natural stone tile to mount something to the wall.
Carbide-tipped masonry drill bits are the most widely known for drilling into tile. They are engineered for drilling into rock-hard surfaces, and with patience and care can be used effectively for drilling through tile without causing the tile to break. The hardest part of drilling into tile without cracking the tile is getting through the hardened, glazed outer surface. Tiles are created to be very durable and withstand tough abuse, but the features that make them durable home products also hinder them resistant to drilling.
15. Stop tearing Trash Bags Caused by Suction
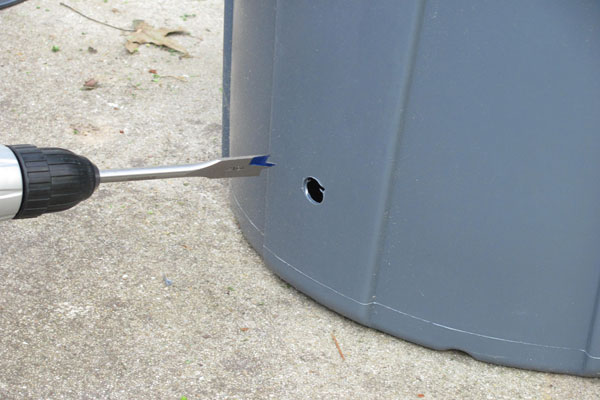
It’s happened to us all, we keep packing in the trash expecting the barrel to magically get rid of it for us — or, patiently waiting for someone else to empty the barrel… When reality kicks in, you try to pull the bag out and it feels like someone’s stuffed a couple of cinder-blocks in the bag.
…What’s the solution to this chaos?
Drill four-holes in the bottom of the barrel and eliminate the pain and heartache of ripping trash bags when pulling them out of the barrel for good : )
16. How to Hardwire a Light Fixture
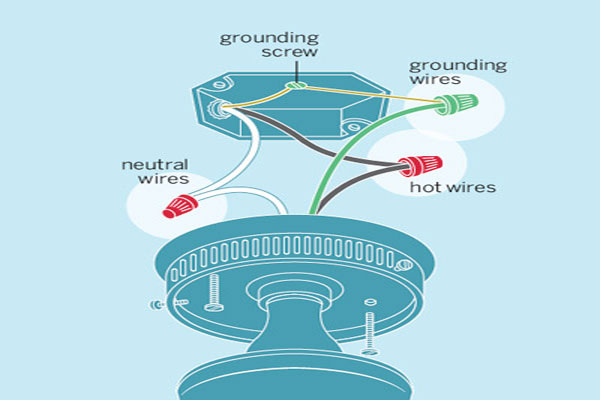
Turn off the breaker that services your lighting. Double check to make sure your power to the light is off by flickering the light switch. Twist the bolts from the existing lighting and pull from ceiling while removing old wire nuts and untwist them. Loosen the grounding bolt and remove the grounding wire. Finally, remove the screws from the lighting plate and viola! Old lighting has been removed.
This next step is very important, decide which of the two wires is the hot wire. If it’s live you WILL GET SHOCKED. The black wire is usually the hot wire, and white wire is neutral. Some homes have only red wires this is when you will need a voltage detector.
Now decide what chord length you want and mount the lighting fixture’s metal plate to the electrical box with the mounting screws. Ensure that the wires from the electrical box are coming through from one side of the metal plate. Strip away the plastic sleeve from some of the wire to expose enough wire to twist together. Twist together the neutral wire from the electrical box and the neutral wire from the light chord. Do the same with the hot wire. Connect the grounding wire in your electrical box with the light’s grounding wire to the grounding bolt.
Lastly, twist the wire nuts onto the wire connection shove the wires and the excess chord into the electrical box, twist the light fixture into the metal plate using the connectors you have. Done.
17. How to Pick an Interior Lock
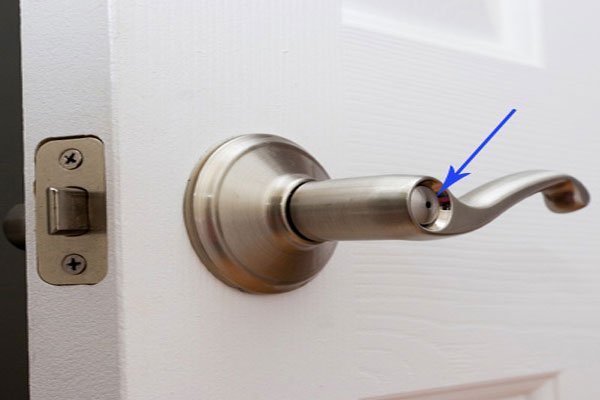
Your 3-year-old is in the bedroom laughing his butt off as he just figured out how to lock out mommy and daddy who want to get him ready for bed. On the doorknob, there should be a small tiny hole that’s made just for this situation. Most homes come with the key designed for this “tiny hole” but are easily misplaced. Take a slim piece of metal (moms can use a hair bobby pin–just bend it straight), such as a small pin-head nail, or a tiny paper-clip, and slip it in the hole. Compress the spring inside or slip the screwdriver head into the slot on the spring and turn. Door unlocked, toddler in bed, mom and dad out smarted their toddler. Success!
18. How to Unstick a Door
There are a few reasons for a door to stick. To identify the problem, close the door, observing it carefully to find the binding point. If there’s a gap between the door and the frame opposite the binding edge, the hinges almost certainly need adjustment. If you can’t see a gap anywhere between the door and the frame and you had to add force to the door to close it, the wood has likely swollen from extreme humidity. Other reason can be due to too much paint, which can be fixed by being planed or sanded on the trouble areas. Think of it as door liposuction.
..Now, this next one is tricky. Make sure you’re in a quiet place in your home to read what I’m about to tell you.
19. Bypass the Electric Garage-Door Opener When the Power is Out
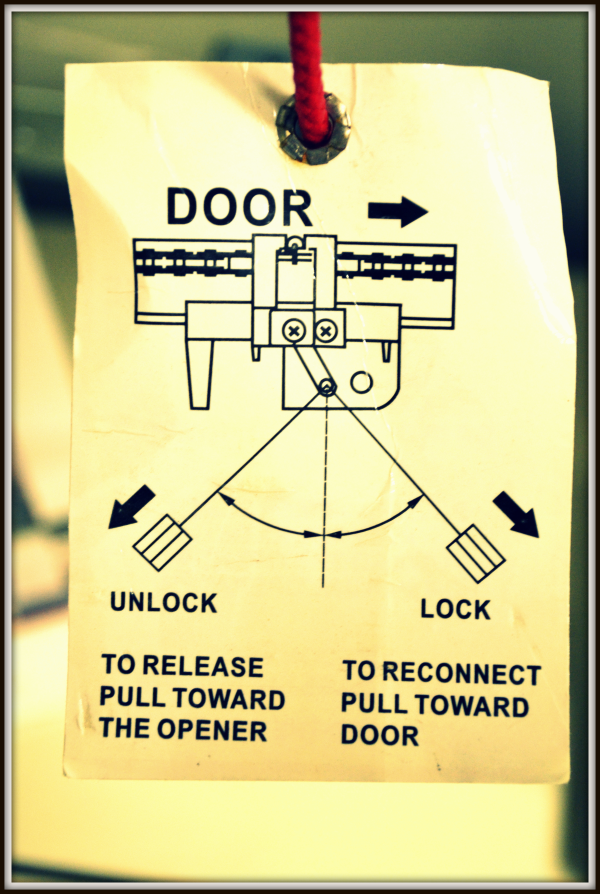
Pull the red cord that hangs from the garage door motor…
…Whew! We got through the tough one. Next.
20. Clean Stained Grout
Stained grout is something that can really corrode the appeal of a room. No matter how many times you surface clean your tile it will ALWAYS look dirty if the grout is discolored. An at home remedy to cleaning grout can be vinegar and water combined with some moderate scrubbing on your part. Another solution would be a bleaching product that is non-abrasive.
21. Know Which Breaker to Turn Off
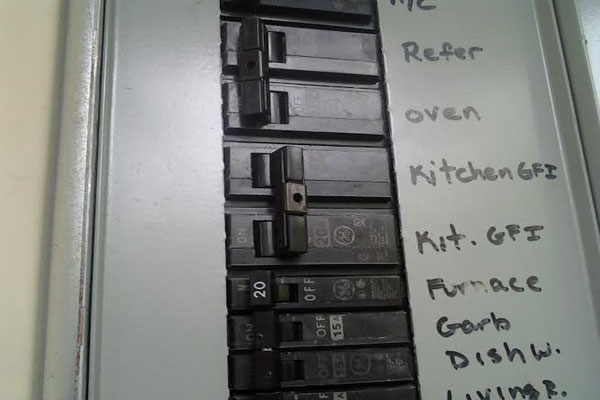
Did the previous owner barely use manpower when applying pressure from his pencil onto the circuit breaker chart, instead applied TLC? Chances are the labels are now faded leaving you scratching your head as to which switch goes to which indoor switch. Once you navigate what goes to what, try labeling it with a fine tip sharpie or label machine. The future owner will appreciate this very much. In the meantime, have someone in your household help you navigate through this process by letting you know what appliance or light comes on when you switch a particular switch. I think I typed switch too many times.
22. Dry Out a Flooded Basement
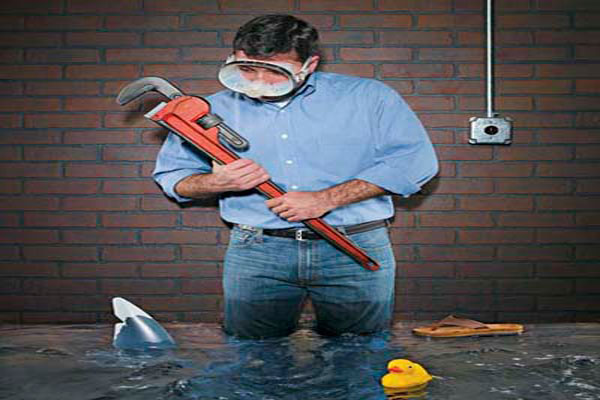
Basement flooding is a catastrophe for any homeowner. Besides making your basement unusable, a basement flood can destroy many items and can cause a serious safety hazard. In a severe, basement flooding situation consisting of water covering the basement floor to a depth of an inch or more, it’s best to stay out of the basement until the water is pumped out. Standing water in your basement can hold harmful bacteria. If you have to go down into a flooded basement, make sure to wear waterproof rubber boots. Steer clear of touching or using electrical devices (except for a battery-powered flashlight) because this puts you at high risk of electrical shock or electrocution. Your local Basement Systems dealer can suggest a professional who will pump standing water out of your basement, and perhaps help you deal with water-damaged items and materials as well.
23. Make Friends with the New Neighbors

If you’re the hoarder type or your “Sanford and Son” tendencies begin to flare up, you will want a neighbor that will NOT be quick to phone in the home association or code enforcement. We are all guilty of a few annoying habits that will get any neighbor rolling their eyes at the thought of having to fake wave each morning as you leave for work, the trick is to cushion it with good redeeming qualities. For instance, when they first move in offer a cold beer to mom and dad and a few popsicles to their kiddies will start you off on the right track. This way, when you have your beat up (hobby car) junk car in the drive way missing the rear wheels, your neighbor won’t have your car reported to the HOA.
24. How to Paint a Double-Hung Window
Leave both sashes slightly open. Then use a brush (angled 1-1/2 inch sash brush) with very little paint on it to coat the vertical, outside edges of the sash. The dry-brush technique prevents paint from running into the crack between the sash and the stops, where it may cause the window to stick. Now wait for the paint to dry before bringing the opened sashes to its originally position, but DON’T shut the sashes completely, just yet. Then paint the remained portion of the outer and inner sash without painting the sill, which needs exterior paint.
You will need to change to a wider sash brush, 2.5 inch angled sash brush is ideal. This brush is to finish off the casing. Work from the corners out using as little paint you can and reapplying a light coating on your brush as needed. You don’t want too much paint on your brush that will cause dripping or a thick puddle being painted on hard to reach areas. Cut in the casing where it meets the wall then paint the stool and do the stops. The stops form the inner edge of the channel for the inner sash. Once the sash dries you may now paint the channels. Slide the sash down to paint the top of the channels and wait for it to dry before sliding the sash back up to paint the bottom. Don’t paint the weather-stripping.
25. How to Secure a Loose Screw
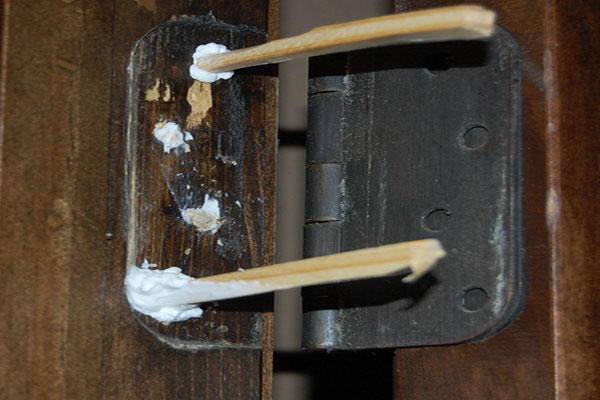
Now don’t go throwing away perfectly good furniture or items because there’s a loose screw.
First you will need to remove the screw and wipe away any sawdust, drywall or other dust from the hole. Then replace the screw if it looks stripped. Wrap some twine around the screw to give the screw more width and add some glue to the string and re-screw it in. Another option to try if the screw is being used to carry very heavy objects is to increase the size of the hole where the screw was placed, originally. Ensure that it is large enough to insert a 1/4-inch dowel rod into the hole. Create the hole to be as deep as the screw you will be inserting in the hole. Saw a piece of the dowel to be identical to the size of the screw. Now add some wood glue to the exterior of the dowel, and shove it into the hole. Wait until the glue dries, and screw the screw into the wooden dowel. You can also substitute dowel rods with: Match sticks and toothpicks.
Page 1 of 2
———-Advertisement———-

Dave says
Maybe replace those lamps with LEDs instead of those mercury laden fluoros.
Mike says
Great idea : )
Lisa says
Awesome tips for new homeowners. I stumbled upon this site after buying a ” fixer upper” and love the tips given. Or was it the image of the cute cat pawing at the faucet? Either way, nice tips and I will make sure to implement them into my new house.
My hubby will be ecstatic that I’m taking the iniative to home repairs!!
Any tips about conquering linenoleom floors? (Sp?)
Mike says
Thanks and I’m glad to have helped in some way 🙂 And yes, I can put Lineoleom flooring into a future post..
LD says
You never ever use WD-40 in a lock as suggested in #5 unless you intend to replace the lock. WD-40 is not a lubricant, is displaces moisture or water. Using WD-40 ensures you that the lock will be gummed up in the future. Graphite is the way to go.
Mike says
You’re right to a point. However, by the time your lock seizes up, don’t you think it’s time to replace? Furthermore, most people have WD-40 kicking around and want to get into their house fast until they can call a locksmith.
Laura F says
Anything you take apart, use your fancy phone to take pictures along the way so you’ll know how it’s supposed to go back together.
Mike says
Great tips, Laura. In fact, as a contractor myself, I do this a lot. It’s a perfect way to remember each and every step in case sh** goes bad : )
ann says
great tips thank you
Mike says
Anytime, Ann. I’m glad you enjoyed them.
Bill handyman Plus says
when drilling tile ,to avoid having the bit wander first take a glass cutter and place the wheel at the point you want to drill apply some pressure and just spin the tool a few times and it will score through the glaze giving you an exact starting point for your drill bit never fails, BILL the handyman
Mike says
Excellent advice, Bill : )
D. Beckett says
You can also place a piece if masking tape where you want to drill. The tape helps keep the drill bit from slipping. This works on any slick surface. Thanks
Laurie Barnett says
I have an almond colored Roman style bathtub with a small hairline crack. We’ve had it tested for leaks and there are none. Any idea on how to make it less obvious…like invisible?
LB